The Chubby Gundark
SoroSuub Transport Systems
Nyubba-Class Cargo Barge Driver
|
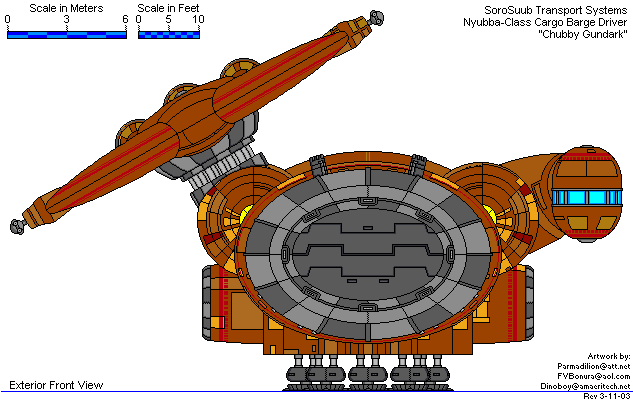
This vessel exterior and deckplan are the product of teamwork. The Chubby Gundark project is the culmination of the ideas and drawing talents of three people: "B.M.K.", Jim Anderson, and Frank V Bonura. This joint effort is our first successful use of an illustrating team to produce deckplans at greater speed without compromising quality. This project heralded a new chapter in the history of the SWDA. It is also the first use of 3D mesh to asist in the in the development process. "B.M.K." is a very talented graphic artist and has a gift for understanding my deckplans and reproducing my style of graphics. You will be challenged to see where his work ends and my work begins. 75% of drawing was done by "B.M.K." Jim Anderson is a gifted comic illustrator and 3D CGI modeler. He is the creator of the Chubby Gundark that |
appeared in The Official Star Wars Adventure Journal, Vol. 1, No. 11, pg. 218. He also created the Bungo and Rusti comic strip and website. His comics add a unique perspective to the STAR WARS Universe. The Bungo and Rusti comics originally appeared in "The Official Star Wars Adventure Journal", Vol. 1, No. 11, pg. 204. Jim's 3D CGI models were pivotal to our success with this project. The front view of the Chubby Gundark clearly shows the ships barge docking mechanism. A similar device is located in the stern of the ship. The dock is used for the ships primary hauling functions. The docks can safely hold 5 Nyabn Gauge cargo pods each (5 fore, 5 aft, 10 total). The docks can also serve as a universal docking hardpoint at most shipyards. |
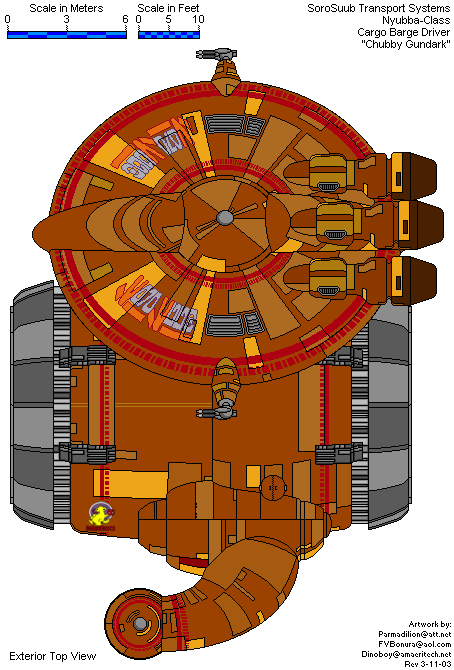
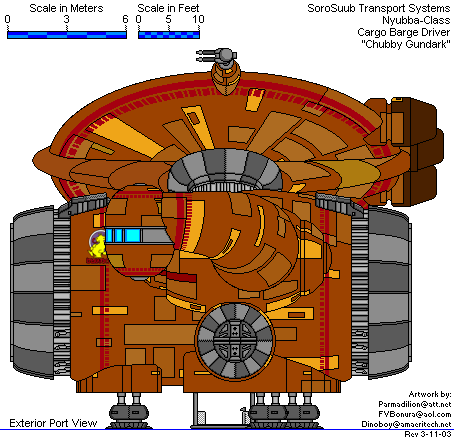
| Exterior Notes: Starting with orthographic screen captures of the 3D CGI model, we resized them and remastered the front, top and port view trying to find a balance between accuracy and clarity. The lower skirt area was lengthened a few inches to accomodate the | landing gear. Other minor adjustments were made keeping comic footage and interior mechanical concerns in mind. All changes were made with Mr. Anderson's input to maintain consistency. It has been a learning experience for all of us. |
|
The Chubby Gundark Statistics and capsule from The Official Star Wars Adventure Journal, Vol. 1, No. 11, pg. 218, written by James Anderson Craft: SoroSuub Transport Systems Nyubba-Class Cargo Barge Driver Type: Cargo Barge Driver Scale: Starfighter Length: 22 Meters Skill: Space Transports: Nyubba-Class Crew: 2 Passengers: 2 Cargo Capacity: 200 Metric Tons Consumables: 2 months Cost: Not available for sale Hyperdrive Multiplier: x2 Hyperdrive Backup: x16 Nav Computer: Yes Maneuverability: 1D Space: 3 Atmosphere: 260; 750 kph Hull: 5D Shields: 1D Sensors: Passive: 10/0D Scan: 25/1D Search: 40/2D Focus: 2/3D Weapons: 2 Double Laser Cannons Fire Arc: Turret Skill: Starship Gunnery Fire Control: 1D+2 Space Range: 1-3/12/25 Atmosphere rng: 100-300/1.2/2.5 km Damage: 4D |
Capsule: If the bulk freighter and the container ship are the work-banthas of the SoroSuub Transport and Supply Division, then the Nyubba-class cargo barge driver is the work-nerf. Though the majority of cargo is hauled using bulk transportation, the use of smaller ships like the Nyubba freighters still accounts for nearly 20 percent of all SoroSuub's cargo transfers. Not particularly pretty, they manage to get the job done. They are slow and lightly armed, making them excellent targets for pirates if they stray too far from designated shipping lanes. The ships are almost fully automatic, only requiring a crew of two: usually one Sullustan and one droid to monitor ship systems and pilot during landing and takeoff. Additional cargo barges can be attached fore and aft of the barge driver, since the freighter's main engines are offset on a lateral strut. The average configuration for hauling is the main engine with three barges fore and three aft, though it's not uncommon that several more are hauled at one time. Extra barges have a Hull of 5D and a cargo capacity of 400 metric tons. Add +1 to the difficulty of any space transports roll for each of the first eight barges. For each additional barge past eight, add +1D to difficulties. There is a rivalry among Nyubba-class freighter pilots over who can haul the most barges over a prescribed distance. The Chubby Gundark holds the record for the most barges hauled over 35 parsecs with an uncontrolled landing: 13 barges! |
|
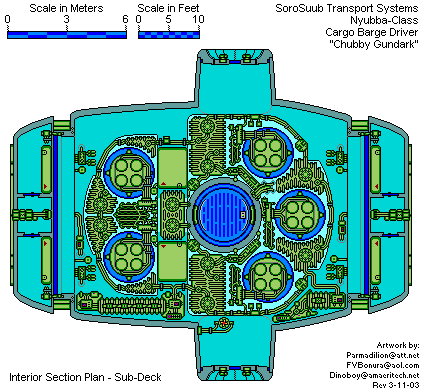
Subdeck: Below Deck 1, in the "bilge", lies the subdeck. The subdeck has a maximum headroom of 4'10", and is crowded with ship systems. Landing Gear: Five assemblies with all their respective hydraulic equipment are on this deck arrayed around the perimeter of the deck's equipment pits. The landing gear doors at the bottom are iris-shaped. Repulsors: Tucked in around the landing gear in the "pit" areas, are the main repulsorlift emitters, and controllers. Cargo Lift: In the very center of the subdeck is the cargo lift tube. This tube comes through the subdeck on its way from ground level to service deck 1, deck 2, and finally open in a large aperture on deck 3. Refueling Hardpoint: Just to the rear starboard of the lift tube can be seen the refueling hoses, this is where fuel and other consumables are pumped into the ship. |
Generators: On the port slopes of the subdeck can be seen the main (fore) and wing (aft) repulsorlift generators. Backup Hyperdrive: Between these two generators, beneath the port docking tube on deck 1, is the back-up hyperdrive; it also acts as a counter to the main hyperdrive in the wing to extend the field around the odd-shaped hull. Lateral Jets: The ship's maneuvering jet systems are located in the four corners of the subdeck. They feed into a series of 16 maneuvering jet nozzles in the fore and aft exterior trenches. Ventral Magnetrons: Between the maneuvering thruster systems lie the magnetic coupling controllers (they control the magnetron and magnetic rail systems for the lower quadrant of the fore and aft barge couplings). Within the lower portion of the barge couplings lies the magnetron, the magnetic generator, and magnetic back-up battery; all enclosed within a small room to act as a firewall between the cells of the barge couplings. Hyperdrive Fluid Storage: Within the couplings and in the sloped area between the "pits" lie hyperdrive fluid tanks. |
|
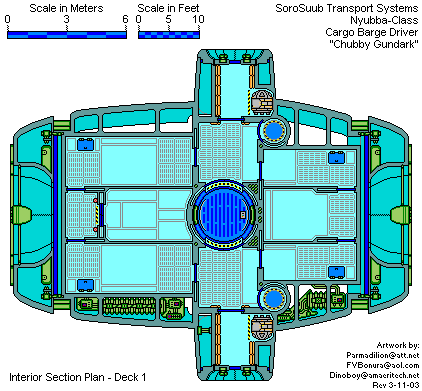
Deck 1 - Docking Deck: This deck has a maximum headroom of 7'4" and serves as the primary entry point into the ship. Docking Tubes (Port & Starboard): These tubes contain an integrated airlock, for space walks and intership docking, as well as normal docking procedures (i.e., docking with refueling posts, terminals, and space stations). Escape Equipment: The ship's one-man escape pods are housed in recesses in the docking tubes (see PES-550 One-man Escape Pod for more information). When used, the escape pods are boarded, then the pods float out into the docking tube corridor, and explosive bolts within the docking mechanism blow the docking ring out and down allowing egress for the escape pod. It should be noted that use of this escape feature will require major repairs to the docking ring if the ship survives the need to escape it. Costs for parts and labor to repair a blown docking ring average about 800 credits. |
Foyers (Port & Starboard): Adjacent to the central cargo lift, are the foyers. These rooms provide access to the special cargo bays (fore and aft), the main cargo lift, and the personnel lifts (port and starboard) These lifts service decks 2 and 3 as well. Special cargo bays (Fore & Aft): The special cargo bays have gratings throughout for access to most of the subdeck machinery, as well as four hatches that drop down into relatively clear areas of the subdeck. These cargo bays can be individually sealed, pressurized, and heated for custom freight requirements. The forward central hold is also rated for bulk liquid storage, but not for corrosive liquids. Lower Barge Clamps (Fore & Aft): At the extreme ends of the ship both fore and aft are the ventral barge clamps or "hitches", 8 of these are arrayed around the perimeter of the "maw" of each barge coupling. The clamps provide both a mechanical and physical connection between the barges and host ship and act as connections for barge-to-ship fuel and atmosphere transfer. |
|
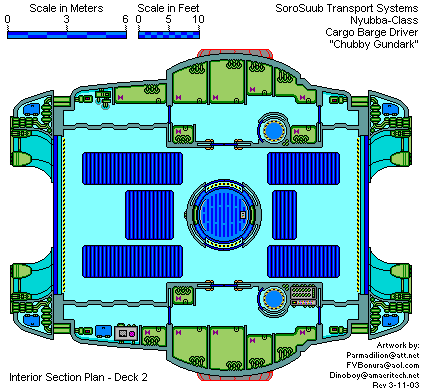
Cargo Deck - Deck 2: This deck holds the main cargo bay, an immense, cavernous, 2-story room with a ceiling height ranging from about 16'4" to 18'4" in the "hump". Main Cargo Bay: This area has a series of six reinforced roll-up doors leading down into the special cargo bays below on deck 1. In the center of the cargo bay is the main cargo lift with access doors port and starboard. Fuel Tank Rooms (Port & Starboard): Adjacent to the main cargo bay lie the port and starboard fuel tank rooms. Both rooms contain firewalls between the tanks. The port fuel tank room contains the massive avionics and navigation computer, this computer orchestrates the massive amounts of data necessary to control so many slaved systems and barges in tight formation. The fuel tank rooms also contain the personnel lift access points for this deck. |
Forward Mechanical Rooms (Port & Starboard): These rooms are foward of the fuel tank rooms. The starboard mechanical room contains an extended reserve fuel tank, the back-up air compressor, and the magnetic control system for the foreward starboard magnetic assembly. The port mechanical room has been modified with a shortened reserve fuel tank and the addition of a Nyuub-Wuuba-Lub Slurpy machine (it currently dispenses Boaboo Blitz, Blue Milk Headbeater, and Cherry). The port forward equipment bay also includes a hatch for access to the fore repulsor generator. Mid-deck Couplings: To the port and starboard sides of the ship, within the barge couplings, you can see mid-deck magenetic assemblies, these coupled with the ones in the top and bottom of both barge coupling form the magnetic seal between each barge and the barge driver, as well as allow for the maneuvering control over the barges. Aft Mechanical Rooms (Port & Starboard): Located aft of the fuel tank rooms, contain the port and starboard aft magnetic controllers. |
|
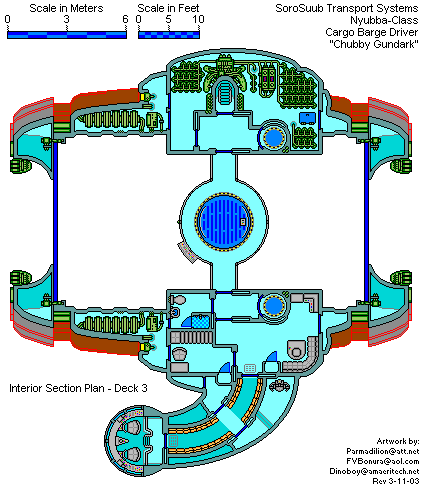
Habitat Deck - Deck 3: This deck has a maximum headroom of 6', and contains: the crew quarters, bathroom, common room, crew storage, spacesuit locker, cockpit, and the ship's life support systems. Port Side rooms: On the port side of the ship is the main crew area. As you enter the crew area, you first enter the lift vestibule. Port Lift Vestibule: This area can act as an airlock in the event of the main cargo bay becoming depressurized, access to the bathroom, common room, and personnel lift are present in this room. Head (bathroom): This room is located Just fore of the lift vestibule. The Head (bathroom) features a toilet, small sink, and shower. This room provides access to the port shield compartment. Shield Compartments: Located further fore still, this room contains 1 shield controller and 1 shield generator each (these systems are mirrored on the starboard side of the ship). These rooms also contain the forward floodlights. Bungo Bung's Room: This room is located adjacent to the shield room and head (bathroom). Bungo has a small desk, a chair, his bunk with a series of drawers underneath it, and a small closet. Bungo has removed the padding from the upper bunk (a stock Nyubba has two bunks) and now uses the upper bunk platform to keep his Boaboo Bonsai. Common Room: Located adjacent to Bungo's room and the vestibule, This room features a couch wrapping around a high-definition holo-table, a storage cabinet, a small kitchen (featuring an autochef and a small preparation table). This room provides access to: the aft equipment niche, the lift vestibule, Bungo's room, and the bridge corridor. Bridge Corridor: Located port of the common room, this corridor is a curved, padded hall sloping up from the common room to the bridge. Half way up this corridor is a landing. The Landing: The starboard doors lead into the spacesuit locker, and the port doors lead to the crew storage room. The crew storage room is terraced into two offset levels and has a small set of stairs. On the Chubby Gundark, it is Rusti's room, where she has her droid-o-matic and her armory. |
Bridge: At the end we come to the cockpit. The Bridge is divided into two levels, the control pit and observer platform. The observer platform is a raised area over most of the cockpit's computer systems and has railings along it's forward edge. The control pit houses the pilot and copilot stations with corresponding control devices and displays. Starboard Side Rooms: On the starboard side of the ship is the engineering area. As you enter this area, you first enter the lift vestibule. Starboard Lift Vestibule: This area can act as an airlock in the event of the main cargo bay becoming depressurized, access to the H2O tank portion of the life support room, the ladderwell to the wing, and personnel lift are present in this room. Life Support Room: This room has two sections divided by the main life support unit and the ladderwell to the wing, the O2 tank portion and the H2O portion. The H20 or fore portion of the life support room contains the primary fuel trunks to the wing, wire trunks, circuit breakers, access to the fore starboard shield compartment, and the H2O tanks. The aft or O2 portion of the life support room can only be accessed by way of the floor hatch from the deck 2 starboard fuel tank room, It contains the aft side of the main life support unit, as well as the O2 tanks, H2O tanks, other gases tanks (depending on cargo or other conditions), consumables management, and wire trunks and circuit breakers coming down from the wing. Central Control Platform: Accessed by the catwalk, the control platform sits atop the main cargo lift tube and has a railing around it. The platform features a large aperture over the main cargo lift to allow for the overhead cargo cranes to reach in and retrieve cargo, as well as an airlock. On the fore port edge of the central control platform is found the cargo bay controller interface, this panel controls the roller doors to the special cargo bays, the main cargo lift, the main doors, the overhead cranes, and the environmental controls for the cargo bay (all of these can be controlled independently from control panels at each point). |
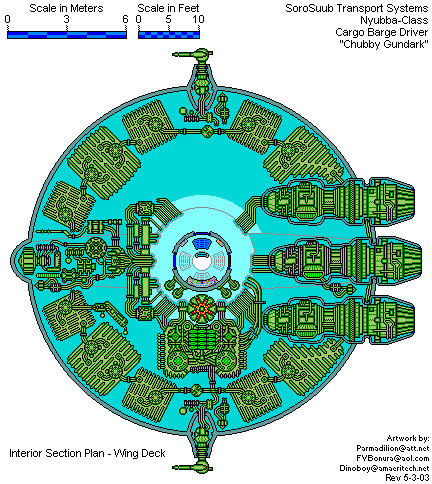
| Wing Deck: This deck contains the power core, weapons, sensors, thrusters, some of their related subsystems, and the wing repulsor assembly. The wing has a headroom of about 5' tapering down to about 1'8" at the edge. The ladderwell travels up from deck 3 to the wing room, a small round room with gravity adjusted 30 degrees off ship. It contains 3 access hatches, a series of four access grates (one of which leads into the large coupling beneath the wing), and the engine control panel. Aft of the wing room are the three thrusters and the aft search sensor. |
Fore of the wing room (named in order as we move forward) is the main fuel pumps, fuel management, sensor management, the subspace radio, the scan sensors, passive sensors, the fore search sensors, and focus sensors. To port of the wing room, fore and aft are the ship's batteries. Nestled between these batteries is the main hyperdrive. Further to port lies the main power core. On either side jut the turrets of the laser cannons and their related subsystems and the port and starboard search sensors. Around the perimeter of the wing can be seen the wing repulsor assembly, this assembly is used to supplement the repulsors on the subdeck, as well as to enhance maneuverability. The repulsor controller for this assembly can be seen just port of sensor management. |
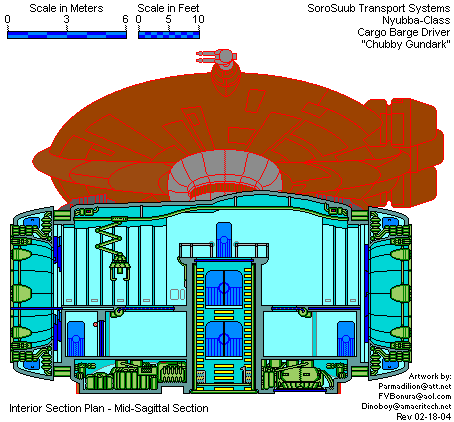
This section was designed to show how the main decks relate to one another. You can also see the workings of the main lift and the overhead cargo manipulator crane in this view.
Return to Main Menu